Financial Education
How To Guides
Accounts Summary
Accounts → Accounts Summary
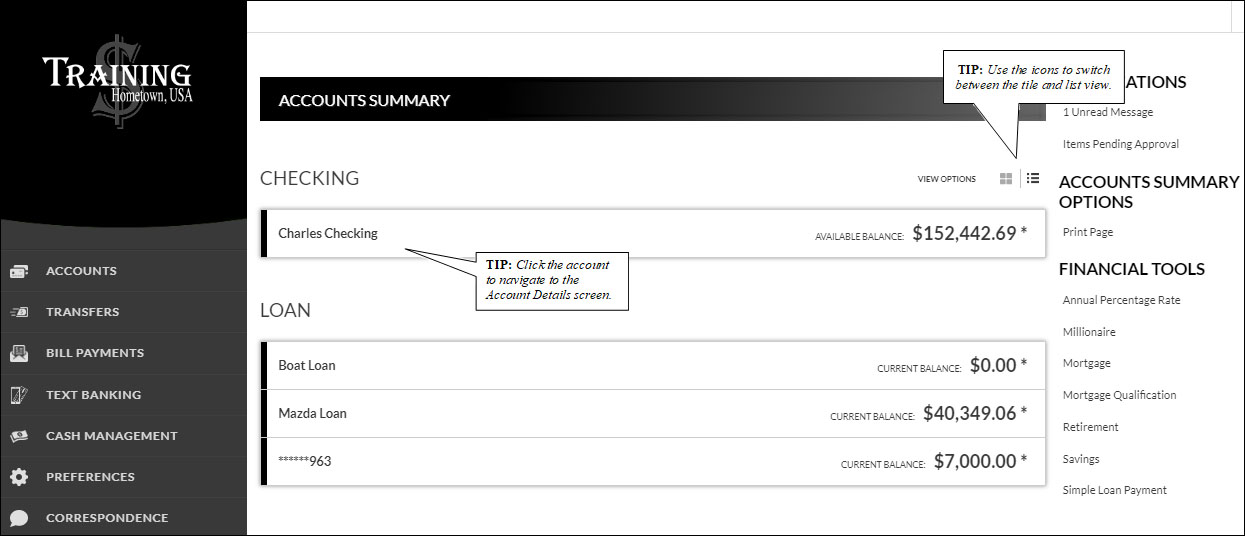
The account summary screen displays a general overview of your accounts as well as Notifications, Account Summary Options, and Financial Tools. This screen is also the landing page for the Online Banking system.
NOTES:
- The options that display vary by Financial Institution
- Accounts that are dormant or inactive will not display
- Loan accounts in a non-accrual status will not display
Transaction History
Accounts → Accounts Summary → Select Account
The Transaction History screen displays detailed account information and transaction history for the selected account.
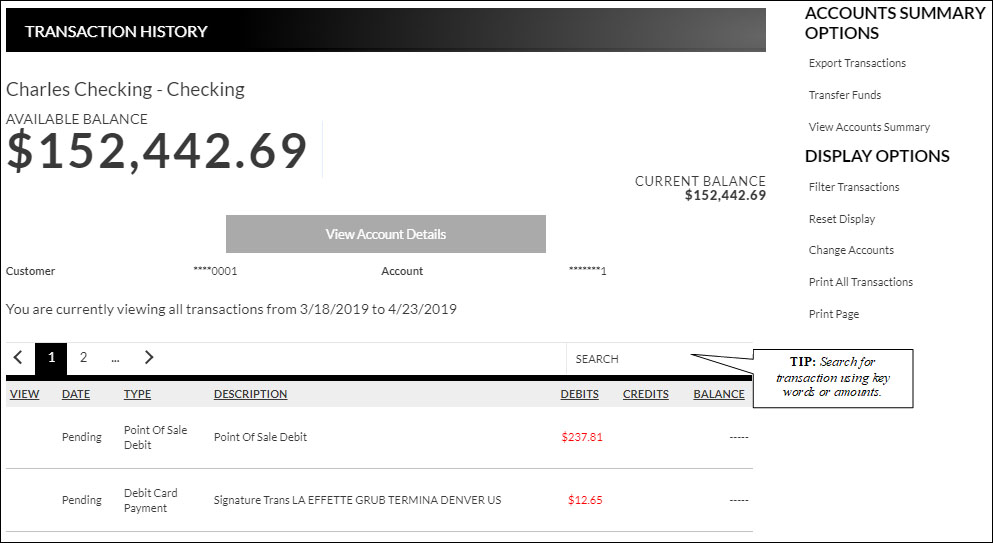
- View Account Details - Expands or collapses details regarding the selected account. Information varies based on the financial institution.
- View - Indicates if there is an image associated with the transaction. Click
 to see the image.
 - Date - Date the transaction posted.
- Type - Type of transaction.
- Description - Description of the transaction as returned from the processing vendor.
- Debits - Dollar amount of the debit transaction.
- Credits - Dollar amount of the credit transaction.
- Balance - Balance for the account.
NOTE: The display for Debits, Credits, and Balance may vary by financial institution.
Accounts Summary Options
View Statements - Directs you to the statement for the selected account.
Export Transactions - Used to export transactions to another software. (ex: QuickBooks)
Transfer Funds - Directs you to the Transfer Funds screen with the specified account displayed in the "To" field.
View Accounts Summary - Directs you to the Accounts Summary screen, which is the landing page for the Online Banking system.
Display Options
Filter Transactions - Ability to narrow down results based on date.
Reset Display - Returns the grid to the view prior to filtering or sorting.
Change Accounts - Click to select a different account to view.
Print All Transactions - Prints all transactions for the selected account.
Print Page - Prints the transaction on the selected page.
Transaction Search
Accounts → Transaction Search
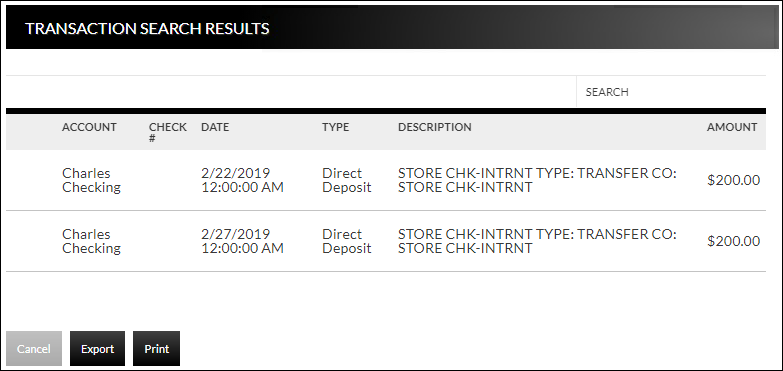
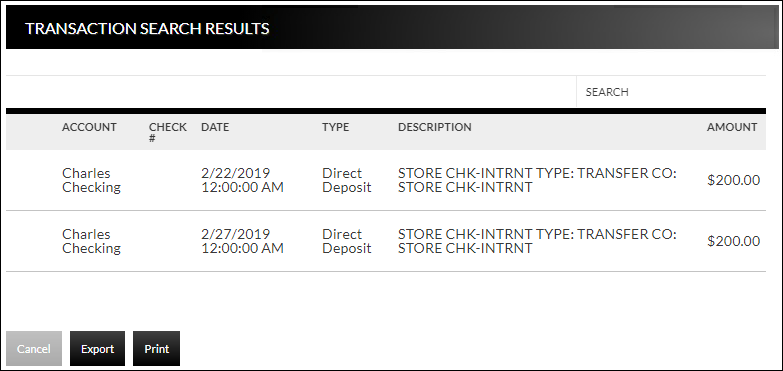
The Transaction Search screen gives you the ability to filter transactions by date, check number, amount, category, or combination of these filters.
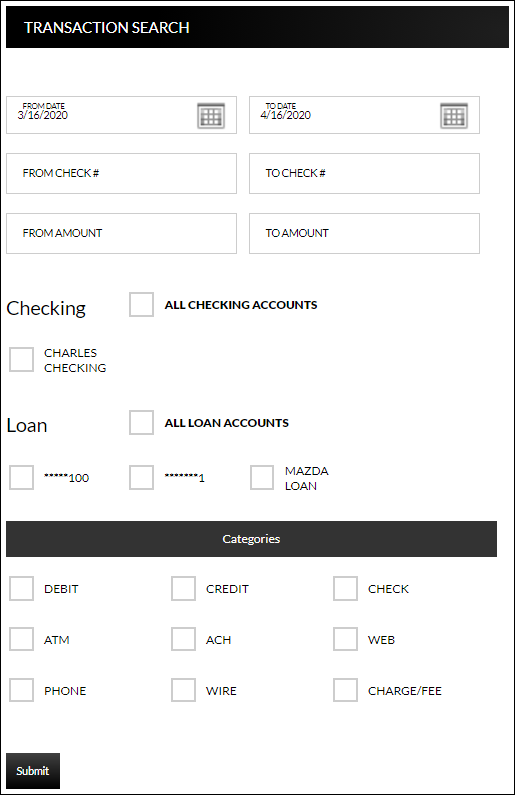
To search, complete the applicable steps:
- Enter the Start Date and End Date
- Enter the check number or range of check numbers
- Enter the amount or amount range
- Select the accounts to search
- Click Categories to view and select categories for the search
- Click Submit
The transactions that fall within the search requirements display. The results can then be exported or printed, if needed.
Bill Pay Single Sign-on
Bill Payment → Go to BillPay
Bill Payment is used to single sign on to the BillPay application. This option only displays if your financial institution offers a bill payment solution.
*The following information only displays if your financial institution offers BillPay through Allied.
BillPay Personal Info
Bill Payments → Personal Information
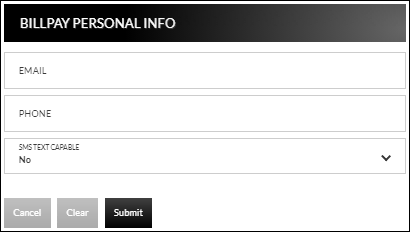
The BillPay Personal Info screen is used to modify the account owner's name and address. This information will be used when paying a bill.
Update BillPay Accounts
Bill Payments → Account Information
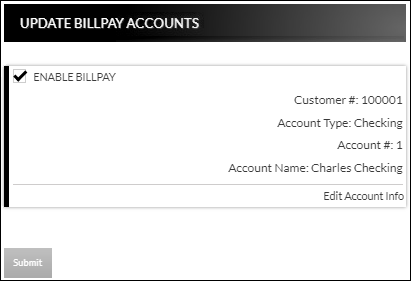
The Update BillPay Accounts screen is used to select accounts that should be available in BillPay.
Bill Payments → Update BillPay Accounts → Edit Account Info
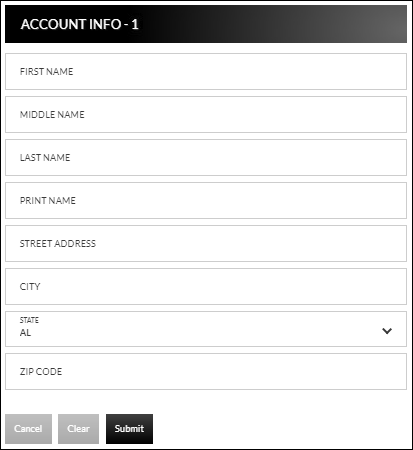
When Edit Account Info is selected, the Account Info screen displays for the associated account. update information as needed and click Submit.
To search, complete the applicable steps:
- Enter the Start and End date
- Enter the check number or range of check numbers
- Enter the amount or amount range
- Select the accounts to search
- Click Categories to view and select categories for the search
- Click Submit
The transactions that fall within the search requirements display. The results can then be exported or printed, if needed.
Account Alerts
Accounts → Account Alerts
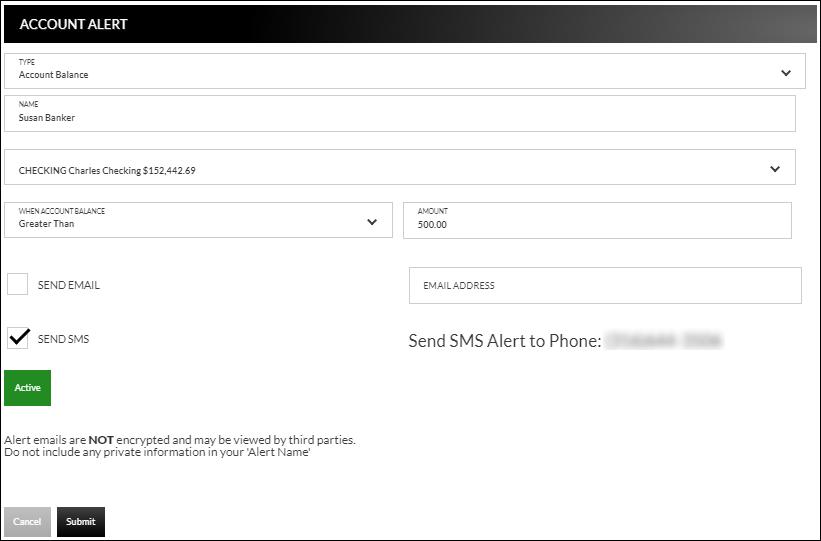
The Account Alerts screen is used to create alerts notifying you of specific account information.

To create a new alert:
- Click Create New Alert
- Select the type of alert. Options are:
- Account Balance
- CD Maturity Date
- Loan Payment Due Date
- Pending Transactions
- Enter a name for the alert
- Select the account the alert is associated with
- Based on the type of alert, different fields display. Complete the displayed fields.
- Account Balance Alert - Indicate if the alert should be prompted when the balance is greater than or less than the indicated dollar value
- CD Maturity Date - Indicate the number of days prior to the maturity date the alert should be sent
- Loan Payment Due Date - Indicate the number of days prior to the loan payment date and alert should be sent
- Pending Transactions - No extra fields display
- Indicate if you would like to have the alert sent via SMS/Text and/or Email.
NOTE: The phone number will default from the Text Banking section - Indicate if the alert is Active or Inactive. By default, the alert is set to Active once the alert is created. To inactivate the alert, click Active and the status will then change
- Click Submit
To edit an alert:
- Click Options
- Click Edit Alert
- Make changes as needed
- Click Submit to save changes. Click Cancel to return to the Alerts screen
To delete an alert:
- Click Options
- Click Delete Alert
- Click OK to delete the alert. Click Cancel to return to the Alerts screen
Inter@ct Integrated Statements/Notices
Inter@ct Integrated Statements/Notice gives customers the ability to view statements and/or notices within Online Banking along with the option of going paperless.
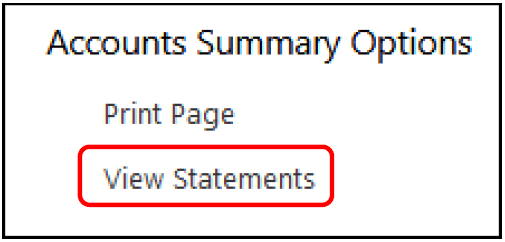
- From the Accounts screen, click View Statements to go to the Statement screen. NOTE: The View Statements option may be available on the Account Summary screen or the Account Details screen
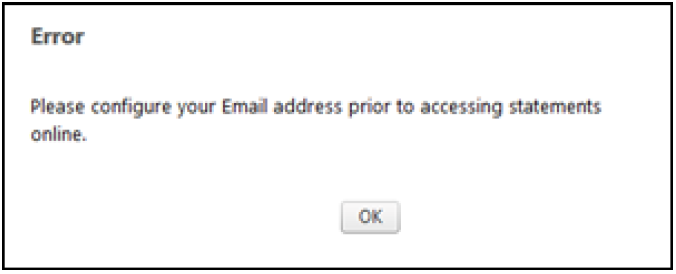
- If the Customer has not configured their email address prior to accessing statements, they will receive the following message:
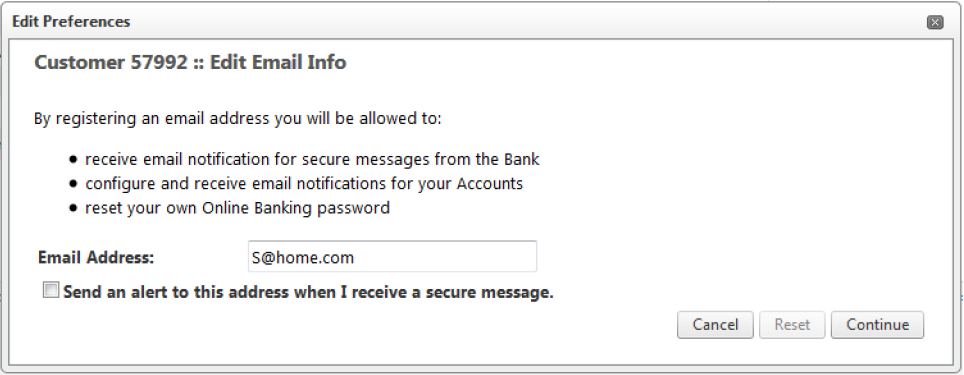
- Navigate to Preferences → Update Email Address to update the email address
- On the Edit Email Info screen, enter a valid email address and click Submit
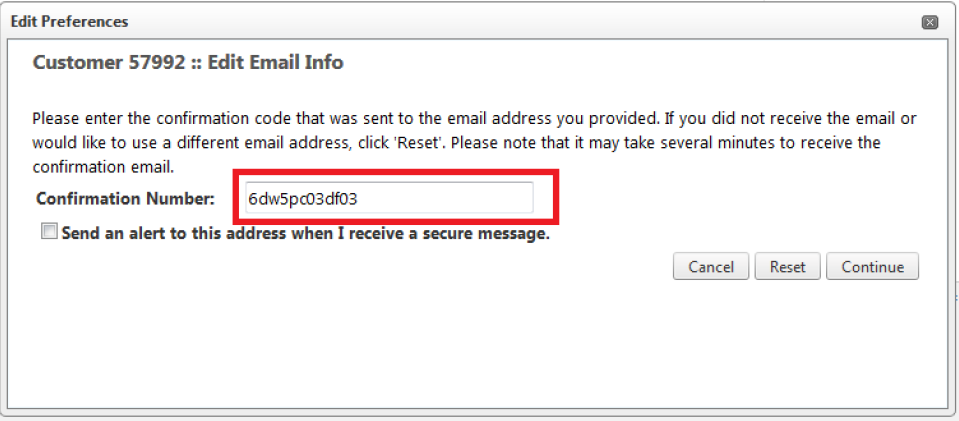
- An email is then sent with the confirmation code that will be used to configure the email
- Enter the confirmation code and click Submit
If you're needing assistance please contact us at (513)353-1339
1.
2.
4.
5.
6.
Transfer Funds
Transfers → New Transfer
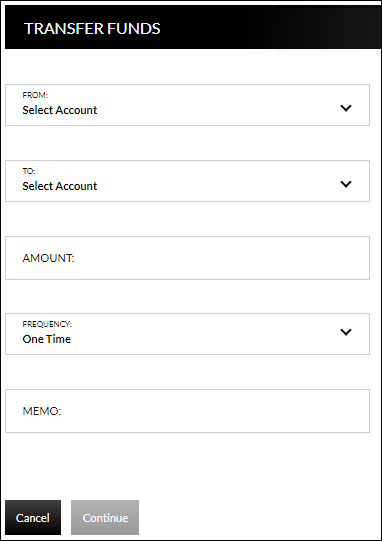
The New Transfer screen is used to transfer money to and from internal and external deposit and loan accounts.
NOTE: External deposit and loan accounts must be created, approved and confirmed on the External Transfer Setup screen in order for them to display within the Transfer Funds Screen.
To create a new transfer:
- Select the From Account
- Select the To Account
- Enter the Amount
- Select the frequency, Options Are:
- One Time
- Future, One Time
- Future, Scheduled
- If a Future option was selected, enter the date the transfer should process
- If the transfer falls on a holiday, indicate if the transfer should process the business day before or after the scheduled date
- If transferring to a loan, select the type of loan payment
- Enter a Memo, if applicable
- Click Continue
- Click Confirm to complete the transfer
NOTES:
- When creating a transfer, one of the accounts must be an internal account
- Transfers involving external accounts may take 1-2 business days to be effective
Transfers
Transfer → View Transfers
The Transfers screen is used to view pending transfers and transfer history. Sort options are available by clicking in the Sort By section. Use the Search section to search for transfers using key words or amounts including the memo information.
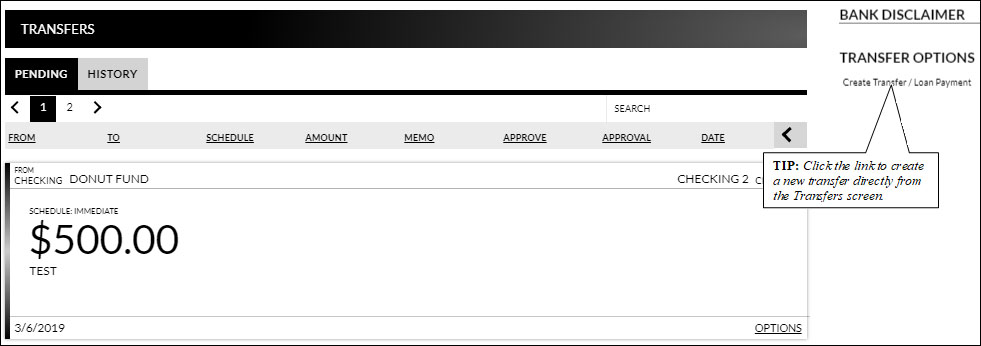
- From Account - Account the transfer is originating from
- To Account - Account the transfer is going to
- Schedule - Depending on the tab being viewed, multiple items may display in this area
- Pending tab - Indicates the schedule of the transfer
- History tab - Status of the transfer
- Amount - Amount of the transfer
- Memo - Memo for the transaction if utilized while creating the transfer
- Approve - Click to approve the transaction. If this button displays, the transaction must be approved prior to the transaction being submitted to the financial institution
- Approved - Date the transfer is scheduled to occur
NOTE: If the Approval button is grayed out, this indicates the user has self-approval rights and has already approved the transaction.
Pending Transfer Options
Pending Transfer Options are available by clicking Options while on the Pending tab.
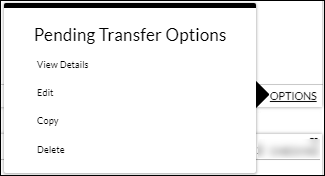
View Details - Displays the details for the selected transfer
Edit - Directs you tot he Edit Funds Transfer screen. If the transfer is recurring, the options to edit the next occurrence or series displays
Copy - Directs you to the Transfer Funds screen, giving you the ability to copy a previously created transfer
Delete - Directs you to the Delete Funds Transfer screen, giving you the ability to delete the next occurrence or delete the series
Transfer History Options
Transfer History Options are available by clicking Options while on the History tab.
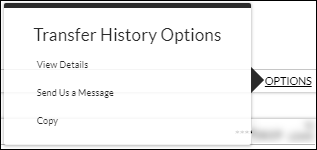
View Details - Displays the details for the selected transfer
Send Us a Message - Directs you to the Compose Message screen giving you the ability to send a message to the Financial Institution
Copy - Directs you to the Transfer Funds screen giving you the ability to copy a previously created transfer
Customer Preferences
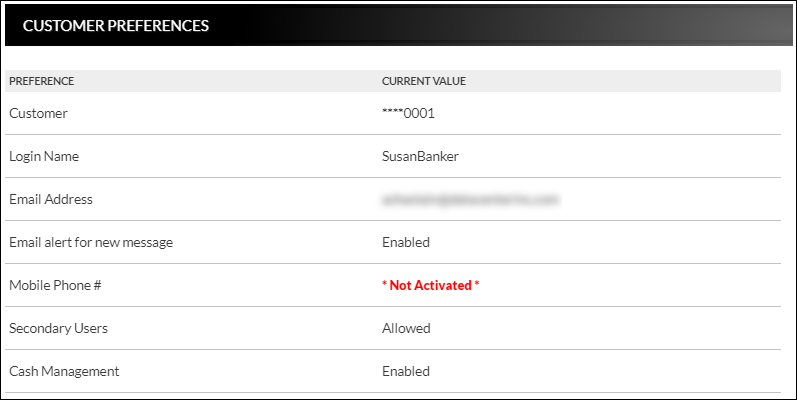
Preferences → Security Options → Customer Preferences
The Customer Preferences screen displays basic information regarding the customer along with the additional applications the customer has access to.
Contact/Authorization Method
Preferences → Security Options → Change Security Contact
The Contact/Authorization Method screen displays contact methods that have been created.

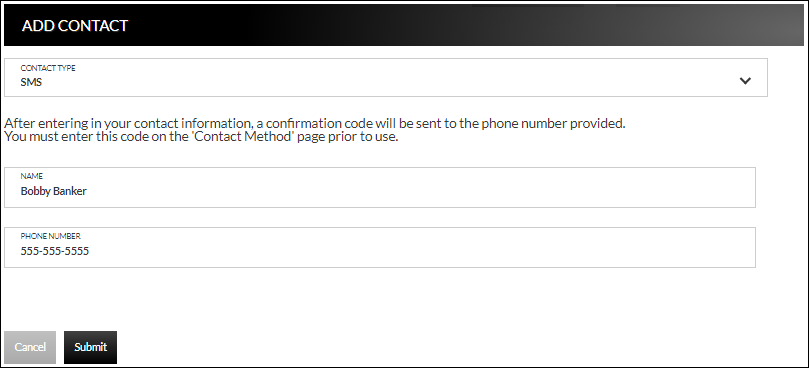
- Click New or New Contact Method to create a new contact method
- Indicate the method for contact in the Contact Type field
- Enter a name in the Name field. This is only used to reference the contact method
- Enter the Phone Number, email, or Google Authenticator information
- Click Submit
- Enter the verification code received via email or text message. If needed, click Resend to receive a new code
- Click Submit
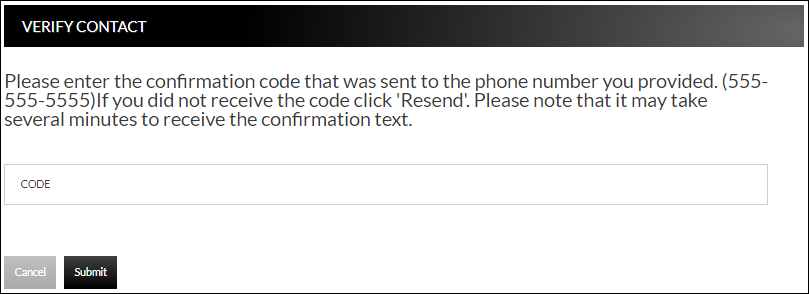
If Cancel was selected, the contact method can still be verified on the Contact/Authorization Method screen. Select  to be returned to the Verify Contact screen.

Edit Login Name
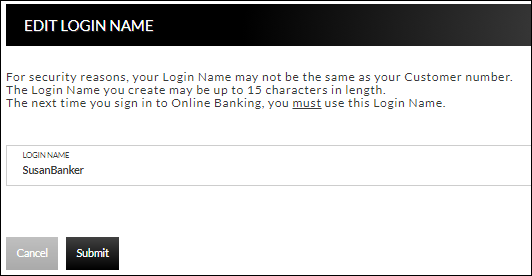
Preferences → Security Options → Change Login Name
The Edit Login name screen is used to edit your login name.
Change Password
Preference → Security Options → Change Password
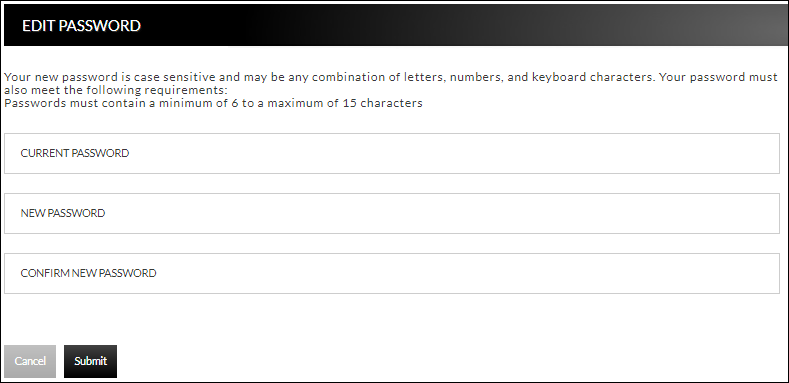
The Edit Password screen is used to edit your password
- Enter the current password used to login to Online Banking
- Enter the new password in the New Password field
- Re-enter the password in the Confirm Password field
- Click Submit
Edit Email Info
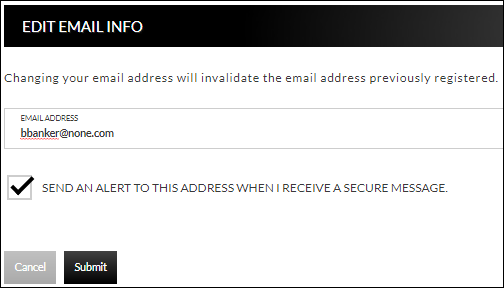
Preferences → Internet Banking Options → Updated Email Address
The Edit Email Info screen is used to edit the email address utilized within Online Banking. This is the address notifications will be sent to regarding correspondence within the Online Banking system.
Friendly Names
Preferences → Internet Banking Options → Friendly Account Names
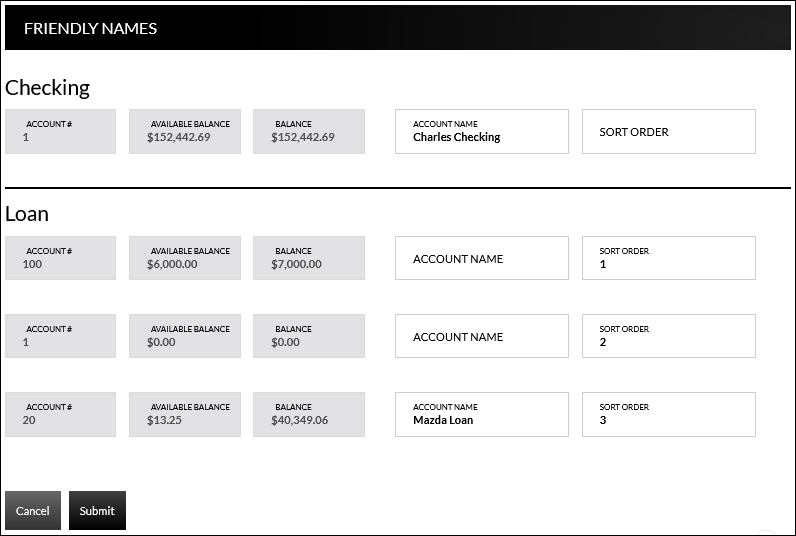
The Friendly Account Names screen is used to create and edit user defined names for the displayed accounts. Once a name has been created, that name will display throughout Online Banking instead of the account number.
NOTE: If your bank offers remote deposit capture and there is duplication of names or usage of special characters in these fields, this will cause errors during the registration process.
Use the sort order column to indicate the order the accounts should display. Sorting will only take effect per account type. For example, you cannot sort checking and loan accounts so they display in a mixed order.
Demo Videos
How to Log into Online Banking
Online Banking Security Preferences
Online Banking Internet Banking Preferences
Correspondence in Online Banking
Click here for HTML/Text version of the video demonstration below.
This is a preview of the Online Banking site.
Welcome to the Online Banking preview course.
Online banking gives you the ability to check your personal account balances, view your transaction history, make payments on loans, set alerts, and more.
Throughout this course use the pause button to pause this video if you would like to review a few of the features of Online Banking. If you choose to pause the video remember to click the "Play" button when you are ready to continue.
Let’s begin by logging on:
Upon logging on, you have multiple resources available. The initial view will be of all of your accounts.
To the left multiple options are available which will allow you to transfer funds, sign up for mobile banking, change your account preferences, and correspond with the bank.
The Account Summary screen is the landing page for the Online Banking system.
It displays a general overview of you accounts as well as notifications, Account Summary options, and financial tools.
Selecting an account, displays the selected accounts running balance for the last 30-days, along with any checks and their images.
If you are searching for a transaction that is past the 30-day window, a filter transactions option is available to change the displayed transactions.
Additionally, the Search option gives you the ability to search the displayed transactions using keywords or amounts.
To the right, Account Summary and Display Options are available letting you quickly transfer funds, change the account that is being viewed, or reset the display.
Nest lest take a look at the Accounts Menu:
The Accounts Menu displays 3 options.
The Account Summary is used to navigate you back to the landing page.
The Transactions search option is used to search for transactions in a variety of categories, and multiple accounts if applicable.
The Account Alerts option, allows you to view alerts that have already been established, along with create new alerts, and edit the time text alerts will be sent.
Alerts can be set based on an account balance, CD maturity date, loan payment due date, or pending transactions.
Next let’s look at the Transfer option:
With Online Banking you have the capability to transfer funds, make loan payments, create transfers to an external account, and view transfer history.
Simply select the account the transfer is originating from, going to, and the amount.
Notice that if your financial institution allows external accounts, there will be an additional heading in the drop down.
Next, select the frequency for this transfer.
Multiple options display, giving you the ability to create a single transfer, a one-time future transfer, or a schedule recurring transfer.
When you select the "Future Scheduled" option, additional fields display allowing you to indicate how often to process the transaction along with the beginning and ending date.
Additionally, if the date you select falls you a holiday, you have the option to indicate if the transfer will occur the business day before, or after the holiday.
If the transfer type selected is for a Loan Account, select the type of payment.
Options display based on your financial institution.
If desired, enter a description in the "Memo Field".
Next is the Bill Payment option:
This option will only display if your bank offers Online Bill Pay.
This option will give you the ability to navigate to Bill Pay, along with update Person and Account Information.
The next option, Text Banking, is used to sign up for Text banking.
Text Banking gives you the ability to receive summary information and balances for all enabled accounts.
It also allows you to message directly with a designated bank contact, along with receiving summary and balance information for specified accounts, via text message.
The next option, Cash Management, will only display if your financial institution offers a Cash Management solution.
Access to this option is based on permissions established at the financial institution level.
Cash Management allows you to create and manage ACH transactions directly within Online Banking.
The preferences menu is used to establish and maintain security and internet options for Online Banking.
These options include maintaining the login name and password, along with the ability to give accounts a friendly name, or create secondary users.
The last option, Correspondence, displays any recent messages form the bank.
When selected, the full message displays.
For additional questions regarding Online Banking, or to sign up please contact a representative at your financial institution.
Congratulations, you have successfully completed this training.
Click here for HTML/Text version of the video demonstration below.
This Demo explains the steps for logging onto the Online Banking site.
Welcome to Online Banking!
This video will demonstrate the steps needed to access your personal online banking account for the first time. NOTES: The look of Online Banking varies by financial institution. To register for Online Banking, please contact the financial institution.
Step 1:
- Enter your login name
- Enter your password
- Click the submit button
Step 2:
If prompted, create a new login name, then click the submit button.NOTE: A new login name will only be required if you were assigned a temporary login name by your financial institution.
Step 3:
Provide a method for contact. This information will be used to send you a confirmation code. This code must be entered prior to accessing your online account information.Step 3 Continued:
- Select the type of contact Method:
- SMS/Text
- Google Authenticator
- Enter a name
- Enter a phone number or email address
- Click the submit button
Step 4:
Enter the code received via text message or email, then click the submit button.Step 5:
If prompted, create a new password and then click the submit button.Step 6:
Register your email address for Online Banking. NOTE: Various features of Online banking require a registered email address.- Enter your email address
- Indicate if you would like to receive an alert to the displayed email address when you receive a secure message within Online Banking
- Click the register button
Step 7:
Enter the received confirmation code then click the submit button.Congratulations!
You now have access to your personal Online Banking account.
Click here for HTML/Text version of the video demonstration below.
This Demo explains the security preferences in the Online Banking site.
Welcome to the Online Banking – Security Preferences chapter
The Preferences menu contains security and internet banking options. This course covers the Security section. The Customer Preferences option displays your current customer preferences, including your customer number, login name, email address, phone numbers and your access level.
Use the Change Security Contact option to view, add, and delete your contact methods. This is the same screen you viewed and completed when first signing up for online banking. To delete an existing contact method, click the "X" in its row.
Then, confirm the deletion of this contact method.
To add a new contact method, click the New Contact Method link and then enter and confirm the contact information. Enter the code that was provided. The Resend button is available to resend the code if it was not received.
The Change Login Name option allows you to edit the name you use when logging into online banking. To update the name, simply enter it in the Login Name field, and then click the Submit button. Please note that the login name can be up to 15 characters in length. Once you save a new login name, you MUST use that name the next time you sign into online banking.
The Change Password option on the Preferences tab can be used to create a new password. Please note that passwords are case-sensitive. Any password requirements will display on this screen. To change your password, begin by entering your current password.
Next, enter the new password and confirm it. Click the Submit button to continue. Your new password is now active and should be used the next time you log into online banking.
Congratulations. You have successfully completed this training.
Click here for HTML/Text version of the video demonstration below.
This Demo explains the internet banking preferences in the Online Banking site.
Welcome to the Online Banking - Internet Banking Preferences Chapter
The Preferences menu contains security and internet banking options. This course covers the Internet Options sections. use the Update Email Address option to edit the email address utilized within online banking. This is the email address to which notifications and correspondence will be sent from the online banking system. To make changes, simply update the email address, select whether or not alerts should be sent when a secure message is sent within the online banking system, and then click the submit button to continue.
The Friendly Names option allows you to create and edit user-defined names for the displayed accounts. Once a friendly name has been entered, that name will display throughout online banking instead of the account number.
To make changes, simply enter or maintain a name next to any account, and then click the Submit button.
Additionally on this screen, you can change the sort order of accounts within a specific type. For example, if you would like account 5572 to display first in the Checking Accounts section, you can change the sort order in that field to 1.
Click Submit to save your changes.
Now, on the Accounts Summary screen the account ending in 5572 displays first in the Checking accounts section. Please keep in mind that accounts can only be sorted within the appropriate sections. You cannot move a savings account above a checking account, for example.
The Opt in Agreements/Policies option displays opt in agreements and policies for your financial institution. These can be viewed by clicking the links in the Notice column.
Congratulations. You have successfully completed this training.
Click here for HTML/Text version of the video demonstration below.
This Demo explains the correspondence in Online banking in the Online Banking site.
Welcome to the Online Banking - Correspondence chapter
The Correspondence tab displays correspondence between you and your financial institution. The Recent Messages section allows you to quickly view and respond to messages. This tab also provides quick links to online forms. Click the View All link to navigate to your online banking inbox. The inbox screen allows you to view incoming messages. Click the view Sent button to display messages you have sent to you financial institution from within online banking.
You can also use the Correspondence tab to access forms available to submit to your financial institution.
Congratulations. You have successfully completed this training.
Click here for HTML/Text version of the video demonstration below.
This Demo explains the accounts in the Online Banking site.
Welcome to the Online Banking - Accounts Chapter
The Accounts Summary screen is the landing page for the Online Banking system. It displays a general overview of your accounts, as well as notifications, account summary options, and financial tools. Keep in mind that the options that display on this screen vary by financial institution. Use the View Options menu to change the view of the screen. The default view displays large tiles for each account, while the list view option displays the accounts in a list format. Notice that your accounts are grouped on this screen based on the type of account. For example, checking, savings CD, and loan accounts each display in separate sections.
Next, let’s look at the options available from the Accounts tab:
The first option, Accounts Summary, directs you to the screen we are currently viewing. Transaction Search provides a way to filter transactions by date, check number, amount, category, or a combination of these items. Use the next portion of this screen to select the account, or accounts, you would like to search within. Click the check boxes for individual accounts or click the checkbox at the top of each section to select all accounts in that section. When you are finished selecting accounts, click the Submit button. Transactions matching the search criteria display. If there is a check image associated with an item, the check icon can be clicked to view the image. Use the Search field to search within the listed transactions for a keyword or amount. The search results can be exported or printed. Clicking the Cancel button returns to the Transaction Search screen.
Another option from the Accounts tab is Account Alerts:
This screen allows you to create and maintain alerts notifying you of specific account information or activity. For example, this customer will receive an email alert when the account ending in 3344 has a balance less than 1,000 dollars. To create a new alert, click the Create New Alert link. Begin by selecting the type of alert. This allows you to receive an alert when an account balance is greater than or less than a specific amount, when a CD maturity date is near, when a loan payment due date is near, or when pending transactions exist. Each alert type has a field for you to enter a name to help identify the alert. Each alert type also has a field for you to indicate which account number should be attached to the alert. The next fields that display on this screen vary based on the type of alert that was selected. Complete these fields to establish the alert. Next, indicate if an email and/or text message should be sent. Please note that in order to use the text option, mobile banking registration must be completed. If it is not, this option may not be selected. Also, notice that alert emails are NOT encrypted. Because of this, please do not include any private information in your alert name. The next button controls whether this alert is active or inactive. Click the button to change the status to Inactive. Click the Submit button to save this new alert. The Options link allows you to edit the selected alert or delete it. Let’s return to the Accounts Summary screen.
Additionally, you can view account details by simply clicking on an account:
This displays transaction history for the selected account. Click the View Account Details button to view additional information regarding the selected account. The fields on this screen will vary based on the type of account, such as due dates for loan accounts and interest information for interest bearing accounts. By default, the transactions display in date order and a running balance is available in the Balance column. Transactions can be sorted by clicking the headings in the grid. For example, let’s sort based on the type of transaction. Clicking a heading once sorts it in ascending order. Clicking a heading a second time sorts it in descending order. Notice that the Balance column, which contained a running balance, no longer displays when the sort order is changed. The Filter Transactions link can be used to filter the transactions that display in the grid. This allows you to filter for a specific type of transaction and date range. Click the Reset Display option if you would like to clear the filter. The search field is also available on this screen and functions the same way as previously discussed.
Let’s return to the Accounts Summary screen.
Congratulations. You have successfully completed this training.
Click here for HTML/Text version of the video demonstration below.
This Demo explains Transfers in Online Banking.
Welcome to the Online Banking – Transfers chapter
Use the Transfers menu to Create or view transfers between accounts. Let’s start by creating a transfer.
CA: Highlight the options, then click New Transfer.
Begin by selecting the From and To accounts:
The available balance of each account displays next to these fields. Next, enter the amount of the transfer. Use the Frequency field to indicate if this is an “immediate one time” transfer, a “future one time” transfer, or a “future scheduled” transfer. If you select the “Future One Time” option a “Process on” field displays. Enter the date that this transfer should occur and then choose whether it should process before or after the scheduled date if the date falls on a holiday. If the “Future Scheduled” option is selected indicate how often this payment should process using these fields. We will use these fields to set up a scheduled transfer to a loan momentarily. For now, let’s set this up an “immediate one time” transfer. You have the option to enter a memo to describe the transaction. This field is not required.
Next, click the Continue button.
Review the information for accuracy, and then click the Continue button when you are ready to complete the transfer. Notice that an Edit button is available if needed. This button allows you to return to the previous view and update the transfer. A confirmation number now displays. You have the option to print this information if needed. Let’s create another transfer. This can be done by using the Transfers menu, or by clicking the Create Transfer/Loan Payment link. This time, we will create a “scheduled recurring” loan payment. Please note that if your financial institution allows you to transfer to or from external accounts, meaning accounts from a different financial institution, those accounts will also be available for selection on this screen. Notice that when a Loan account is selected, the regular payment amount displays next to it. Please note that this is only the case for loans you have through this financial institution, not for external loans.
Next, indicate the type of loan payment. Again, review the information and then click the Confirm button to continue.
If your financial institution allows you to transfer to or from external accounts, meaning accounts from a different financial institution, use the External Funds Transfer Accounts screen to set these accounts up. If external accounts already exist, they display on this screen. To set up a new external account, click the Create External Transfer Account option. Use this screen to enter the required information for the account. Use the Account Type field to specify if this external account is a checking, savings, or loan account.
Click the Submit button to continue.
If this is a checking or savings account, a message from your financial institution will display, indicating that additional steps must be completed. The new account displays on the list. Notice that this account is awaiting approval from your financial institution. Once it is approved the status will display “approved and awaiting confirmation.” Once the two small deposits are made into this account you will see an icon on this screen that, when clicked, will allow you to input the small deposit amounts. This will confirm the account, and you will then be able to transfer from and to it on the Transfer Funds screen you saw earlier. Hover over the Transfers tab.
Next, let’s quickly review the View Transfers option.
This screen allows you to view pending transfers and transfer history. The Options link next to a pending transfer allows you to view the details of the transfer, or to edit, copy, or delete the transfer. The Options link next to a transfer history record allows you to view the details of the transfer, or to copy the transfer. You also have the option to send a message to your financial institution from this menu.
Congratulations. You have successfully completed this training.
Other Financial Links
American Bankers Association

The American Bankers Association offers money tips for young Americans, financial information and education resources and information on the dangers of debt accumulation while young, savings and investment information, first-time credit information, and financial planning education.
Security
Banking is becoming increasingly digital and provides convenience and many benefits to consumers. However, risks associated with online banking and other forms of identity theft grow each year. Be vigilant and keep your information safe by following best practices.
Please note that Miami Savings Bank does NOT ask for PINs, passwords, full social security numbers, etc. via unsolicited phone calls, emails, or text messages.
- We will only ask for identifying information when you initiate contact with us directly.
- You may receive a two-factor authentication code via text or email when logging in to your Online Banking account.
- If you have a debit card, you may receive fraud alerts via text message which only require you to reply with a simple yes or no
Texts or emails sent by our system will not require you to click a link or provide your personal information.
Business Customers should perform a risk assessment and evaluate their controls periodically.
Tips to Avoid Identity Theft & Fraud
1. Never reply to an email, text, or phone call with your information or provide information by clicking a link from an email. Instead, directly type in the web address of the genuine website into your browser and log into the authentic website.
2.Be especially wary of fraudulent emails or websites that have typos or other obvious mistakes.
3. Use a Link Checker to scan a website URL before accessing any website in question.
4. Choose PINs and passwords that would be difficult to guess and avoid using easily identifiable information, such as your mother’s maiden name, birth dates, marriage dates, the last four digits of your social security number, or phone numbers.
5. Pay attention to billing cycles and account statements and contact your bank if you don’t receive a monthly bill or statement. Identity thieves often divert statements and documents.
6. Be careful about where and how you conduct your financial transactions. For example, don’t use an unsecured/public Wi-Fi network because someone might be able to access the information you are transmitting or viewing.
7. Be on guard against fraudulent checks, cashier’s checks, money orders, or electronic fund transfers sent to you with requests for you to wire or otherwise pay back part of the money.
8. Be wary of unsolicited offers that require you to act urgently especially if they threaten some sort of negative consequence if you don’t.
9. Be wary of any offers that pressure you to send funds quickly by wire transfer, cryptocurrency, or gift cards and involve another party who insists on secrecy.
10. Don't click links you’re unsure of. Assume any offer that seems too good to be true is probably fraud. Be careful of scams with outrageous holiday offers, bonuses, or lottery winnings. Do careful research of the company and ensure you are on the legitimate website for the company before providing them with your information.
11. Check your statements - Keep a record of your purchases and regularly compare them to your bank statement. If there is a discrepancy, report this right away.
12. Check your credit report at least once a year and review for accuracy.
Steps to Take if you are Scammed or are a Victim of Identity Theft
- Please contact us immediately via phone at 513-353-1339 or email info@miamisavingsbank.com
- Review your recent transactions for any transactions you do not recognize and report any discrepancies right away.
- Request your free credit report to review for accounts opened or any other unusual activity.
- Contact credit bureaus for ongoing credit monitoring and possibly freeze your credit
- Report any cyber related scams to the Internet Crime Complaint Center
View More Tips on How To Stay Safe Online and Beyond


